Sunday, September 28, 2014

12 Sri Lankan bank's internet payment gateways


sri lankan payment gateways integration
 Local bank gateways have a similer process to that of Paypal (as per the paypal IPG diagram above) but funds get to your merchant account directly

Other than the international payment gateways like PayPal, 2Checkout and Skrill, these are some of the payment gateways offered by well reputed banks in Sri Lanka.

HNB Bank Payment Gateway – The internet payment gateway (IPG) is offered by HNB bank. This is widely used among some reputed companies in Sri Lanka. The HNB payment gateway could be used to accept Master and VISA Credit/Debit/Web Cards in Sri Lanka.

HSBC Bank Payment Gateway – This is one of the well reputed bank gateways (International). Ideal for companies that is planning to operate in other Asian countries as well. The HSBC payment gateway could be used to accept Master and VISA Credit/Debit/Web Cards in Sri Lanka.

Sampath Bank Payment Gateway –This is one of the most affordable Sri Lankan bank internet payment gateways (IPG). The Sampath payment gateway supports Master and VISA Credit/Debit/Web Cards online.

NTB Bank Payment Gateway –This is good if you want to accept AMEX Credit Cards in Sri Lanka.

Procedure of getting a Sri Lankan bank internet payment gateway ?

1. Has to be a registered company/organization/government institution in Sri Lanka and you have to request the IPG from the bank. So basically each bank will check your business type and performance and then they will decide whether to give or not to give the bank payment gateway.

2. If a green light is received for the payment gateway by the bank for you, then you could inform us about it. So that we will update with the technical details and filling of technical details of the information forms.

3. Once the bank provide the IPG details, we will make the integration in 2-4 weeks’ time.

Where Can I use the Sri Lankan bank internet payment gateways ?

1. Shopping Cart Sites
2. Online Registration / Subscription Services
3. Online Hotel Reservation Sites

What are the advantages of the Sri Lankan bank Gateway ?


1. You will instantly receive the online payment made by your client to your company current account.
2. You can check payment details via the online account provided by the bank
3. The commission per transaction is far less compared to that of international payment gateways

What are the disadvantages of the Sri Lankan bank gateways ?

1. Has to pay higher setup fees whereas international payment gateways have very low setup fee or zero setup fee. 2. Has to be yearly base renewal fee whereas international IPG’s never have such yearly based payments.

So does R G Web Design Lanka, the web development company integrates any payment gateways and how are the charges ?

Yes we integrate international and local payment gateways at an affordable fee. Basically the cost per payment gateway integration is around LKR 30,000/=. (Currently we do not integrate payment gateways for web sites/shopping carts done by third parties. We integrate payment gateways for only new sites )

So what else is needed for the Sri Lankan bank internet payment gateways ?

You will require a SSL Certificate and a Dedicated IP. Both could be provided by us at an affordable fee and yearly renewal fee too applies.


Looking to get a shopping cart developed ? then jump to our shopping cart development in Sri Lanka Section. If it is a web system, then jump to our web development in Sri Lanka section.


Thursday, September 25, 2014

Hidden Attribute Removing Tool - ( Hidden folders in pen drive-because of virus [Solved] )


Attribute Changer


As the name suggests, Attribute Changer allows users to quickly and easily change the attributes of files and folders. Its seamless integration into Windows makes it a good choice for users who frequently need to make these types of changes.

Once installed, the program is accessed by right-clicking on the file or folder in question. From there, the program opens, with its functions organized into tabs for folder properties, file properties, reporting, and settings. The program allows users to change the file type (hidden, compressed, read-only, and so on) and adjust date and time stamps. Although the built-in Help file does an adequate job of explaining the program's features, it's definitely not geared toward novices; the program and Help file both assume that users will have some experience with changing attributes and will know the hows and whys of doing so. For example, the Help file warns users "Be careful in changing the System and Hidden attributes. They are used by the Windows operating system to flag special folders." If you don't already know what you're doing, Attribute Changer isn't going to explain it for you. But if you are used to working with attributes, Attribute Changer is an accessible, easy way to quickly make the desired changes.

Attribute Changer is free to try, but there was no indication of whether there are trial limitations. The program installs and uninstalls without issues. We recommend this program to intermediate and advanced users.


Wednesday, September 24, 2014

Download WooCommerce Premium Plugins Free (Latest Version) ,

WooCommerce Premium Plugins Download WooCommerce Premium Plugins (Latest Version)


WooCommerce is a free, powerfulWordPress eCommerce plugin. With the extendability of a huge catalog of commercial themes and extensions we have all the tools you might need to get your shop running.

A catalog of commercial plugins built & supported by WooThemes :

  1. WooCommerce Pre-Orders v1.0.4 Latest.

  2. WooCommerce Product Bundles v3.6.1 Latest.

  3. WooCommerce Product CSV Import Suite v1.8.0.

  4. Woocommerce Product Support v1.1.0 Latest.

  5. WooCommerce Sequential Order Numbers Pro v1.5.6 Latest.

  6. WooCommerce UserVoice Integration v1.1.2 Latest.

  7. WooCommerce Advanced Notifications v1.1.3 Latest.

  8. WooCommerce Brands v1.1.8 Latest.

  9. WooCommerce Bulk Variation Forms v1.0.6 Latest.

  10. WooCommerce Custom Checkout Options v1.0.8 Latest.

  11. WooCommerce Facebook Tab v1.1.3 Latest.

  12. WooCommerce FedEx Shipping Method v3.1.6 Latest.

  13. WooCommerce Measurement Price Calculator v3.1.2.

  14. WooCommerce OrderCustomer CSV Export v2.0.6.

  15. WooCommerce Paymill Gateway v1.5.

  16. WooCommerce PDF Invoice v1.2.3.

  17. WooCommerce PDF Product Vouchers v1.1.1.

Demo WooCommerce Premium Plugins (Latest Version)


http://www.woothemes.com/plugins/

Download WooCommerce Premium Plugins (Latest Version)


http://www.nowdownload.ch/dl/cpxq2qnaeka9y

http://www69.zippyshare.com/v/68877387/file.html


Download WooCommerce Premium Plugins (Latest Version)

Sunday, September 14, 2014

XAMPP Apache + MySQL + PHP + Perl

What is XAMPP?

 XAMPP is the most popular PHP development environment XAMPP is a completely free, easy to install Apache distribution containing MySQL, PHP, and Perl. The XAMPP open source package has been set up to be incredibly easy to install and to use.

Why use XAMPP?
  • The most popular PHP dev package
  • For Windows, Mac OS X & Linux
  • Easy installation and configuration
  • Completely free of charge

Download

Click here for other versions
 

Thursday, June 5, 2014

How to create a simple yet attractive CSS horizontal menu (with depth effect)


How to create a simple yet attractive CSS horizontal menu with depth effect
Using CSS to create your website navigation (or menu) is the smartest thing you can do. Why? – Because updating it is a breeze, and you will thank yourself everytime you have to add or remove a menu item while avoiding having to edit tons of individual pages on your website.

With a CSS menu, you can have ONE central file where your menu lives, and just include that file on every page of your website. Since horizontal menus are popular these days, this demonstration will show you how to create a simple yet elegant CSS horizontal menu for your website.

A sneak preview of our horizontal CSS menu:

Creating a list

Let’s begin. The first thing you have to do is make your list containing the links to all your pages:
<body>
<ul>
<li><a href=”#”>Home</a></li>
<li><a href=”#”>What We Do</a></li>
<li><a href=”#”>Locations</a></li>
<li><a href=”#”>Partnerships</a></li>
<li><a href=”#”>Contact</a></li>
</ul>
</body>

Converting the vertical list into a horizontal list

To get rid of the bullets and change the orientation from vertical to horizontal, we apply the following styles:
<style>
ul {list-style-type:none; margin:0; padding:0; overflow:hidden;}
li {float:left;}
</style>

…so our menu is now horizontal:

Add the following styles for the links within the list, so that they behave as block elements, with a bit of breathing room between them:
<style>
ul {list-style-type:none; margin:0; padding:0; overflow:hidden;}
ul li {float:left;}
ul li a {display:block; text-decoration:none; text-align:center; padding:9px 17px 9px 17px;}
</style>


…so the result looks like this:

Making it presentable

Now that the horizontal menu is in place, we add more styles to make it look less like floating text and more like a navigation bar:
<style>
ul {list-style-type:none; margin:0; padding:0; overflow:hidden;}
ul li {float:left;}
ul li a {display:block; text-decoration:none; text-align:center; padding:9px 17px 9px 17px; font-family:Arial; font-size:8pt; font-weight:bold; color:#ffffff; text-transform:uppercase; border-right:1px solid #607987; background-color:#7195aa; text-transform:uppercase; letter-spacing:.08em}
ul li a:hover {background-color:#3b6a85; color:#a2becf}
ul li a.first {border-left:0}
ul li a.last {border-right:0}
</style>

Since we don’t want the first and the last items of the menu bar to have a side border, we tweak the HTML just a bit by adding classes to both the first and last items in the menu:
<body>
<ul>
<li><a class=”first” href=”#”>Home</a></li>
<li><a href=”#”>What We Do</a></li>
<li><a href=”#”>Locations</a></li>
<li><a href=”#”>Partnerships</a></li>
<li><a class=”last” href=”#”>Contact</a></li>
</ul>
</body>

…and the floating text has transformed into a horizontal menu bar:

Adding dimension

Although we can stop here….it would be nice to add a little bit of dimension to the menu bar – just to give it some life. All this requires is that we replace the background colors with background images.
These are the two images we’ll use – save them in the same folder as the navigation bar:
menu bg    (menu background image)
menu bg upon hover    (menu background image at mouseover)
Now in your styles, tweak the background (for both a and a:hover), add some borders, and increase the right and left padding…your code should look like this:
<style>
ul {list-style-type:none; margin:0; padding:0; overflow:hidden;}
ul li {float:left;}
ul li a {display:block; text-decoration:none; text-align:center; padding:9px 20px 9px 20px; font-family:Arial; font-size:8pt; font-weight:bold; color:#ffffff; text-transform:uppercase; border-top:1px solid #9cbed2; border-right:1px solid #607987; border-left:1px solid #94b5c8; background: #7195aa url(bg.gif) repeat-x; text-transform:uppercase; letter-spacing:.08em}
ul li a:hover {color:#a2becf; border-top:1px solid #72a0ba; border-right:1px solid #2a4a5f; border-left:1px solid #8cb3c9; background: #3b6a85 url(bg2.gif) repeat-x}
ul li a.first {border-left:0}
ul li a.last {border-right:0}
</style>

Here is the enhanced version of our horizontal menu bar:

Creating the “you are here” effect

And finally…how do we change the background of the link that corresponds with the current page being viewed?
To do this, let’s revisit our HTML code for a second. In your HTML, give each menu link a special ID, for example:
<body>
<ul>
<li><a id=”nav-home” class=”first” href=”#”>Home</a></li>
<li><a id=”nav-whatwedo” href=”#”>What We Do</a></li>
<li><a id=”nav-locations” href=”#”>Locations</a></li>
<li><a id=”nav-partnerships” href=”#”>Partnerships</a></li>
<li><a id=”nav-contact” class=”last” href=”#”>Contact</a></li>
</ul>
</body>

For consistency, each ID begins with “nav-” because it’s easier to recognize in a busy stylesheet. In addition, give the body tag of each page a special ID. For example:
Homepage:
<body id=”home” >
</body>

What We Do:
<body id=”whatwedo” >
</body>

Locations:
<body id=”locations” >
</body>

(you get the idea)….make it a habit to do this for every page on your website.
Why? Because it allows you to target a specific page and assign its elements a unique style. For example, if links on every page are blue, but you want the links on your homepage to be green, you can do this using the body IDs.
In your stylesheet, find the a:hover styles. Here, you will tell the menu which link to highlight depending on which page is being viewed, like I’ve done below (separating each selector with a comma):
<style>
ul li a:hover,
body#home .nav-home,
body#whatwedo .nav-whatwedo,
body#locations .nav-locations
{color:#a2becf; border-top:1px solid #72a0ba; border-right:1px solid #2a4a5f; border-left:1px solid #8cb3c9; background: #3b6a85 url(bg2.gif) repeat-x}
</style>

So now, assuming that we’re viewing the page called “What We Do”, our horizontal CSS menu should look like this:

The complete code

In case you got lost anywhere in this demo, your complete code should now look like this:
<!DOCTYPE html>
<html>
<head>
<title>How to create a simple CSS horizontal menu</title>
<style>
ul {list-style-type:none; margin:0; padding:0; overflow:hidden;}
ul li {float:left;}
ul li a {display:block; text-decoration:none; text-align:center; padding:9px 20px 9px 20px; font-family:Arial; font-size:8pt; font-weight:bold; color:#ffffff; text-transform:uppercase; border-top:1px solid #9cbed2; border-right:1px solid #607987; border-left:1px solid #94b5c8; background: #7195aa url(bg.gif) repeat-x; text-transform:uppercase; letter-spacing:.08em}
ul li a:hover,
body#home .nav-home,
body#whatwedo .nav-whatwedo,
body#locations .nav-locations
body#partnerships .nav-partnerships,
body#contact .nav-contact
{color:#a2becf; border-top:1px solid #72a0ba; border-right:1px solid #2a4a5f; border-left:1px solid #8cb3c9; background: #3b6a85 url(bg2.gif) repeat-x}
ul li a.first {border-left:0}
ul li a.last {border-right:0}
</style>
</head>
<body>
<ul>
<li><a id=”nav-home” class=”first” href=”#”>Home</a></li>
<li><a id=”nav-whatwedo” href=”#”>What We Do</a></li>
<li><a id=”nav-locations” href=”#”>Locations</a></li>
<li><a id=”nav-partnerships” href=”#”>Partnerships</a></li>
<li><a id=”nav-contact” class=”last” href=”#”>Contact</a></li>
</ul>
</body>
</html>

Don’t forget…

• Change <!DOCTYPE html> to an actual doctype. (see why it matters)
• Move everything between the <style></style> tags into a separate. stylesheet
• Move everything between the <body></body> tags into an include file before you place the actual code for your website here.
(Without these last 2 steps, updating the horizontal menu on every single page will turn into a headache)
Also….
Just kidding, that’s it! :D


Wednesday, June 4, 2014

WAMPSERVER


a Windows web development environment.
WampServer is a Windows web development environment. It allows you to create web applications with Apache2, PHP and a MySQL database. Alongside, PhpMyAdmin allows you to manage easily your databases.

Click to Download  - http://www.wampserver.com/en/#download-wrapper


Monday, April 28, 2014

How to Delete Windows Temporary Files on Your PC


011011_rg_CleanUpTempFiles_01.jpg


Windows tends to accumulate thousands of small files that will slow down the overall performance of your PC if you aren't careful. There are some easy ways to take care of this issue. A few of them are straightforward, by using some of the features and programs that are already installed. Others involve navigating through the C:\Windows file. We have got you covered on both ways.


011011_rg_CleanUpTempFiles_02.jpg


The first and easiest way is to run the Disk Cleanup took that you can find here:

Star menu-> All Programs-> Accessories-> System Tools-> Disk Cleanup

Disk Cleanup will take you through the steps on how to clean up your temporary files. As you can see from the above image, I had over 7.4 GB in temporary files. This is an easy way to take care of this problem. The other way to do so is to go through your browser. You have to open up the Preferences or Options menu. Once you have it open, find the Privacy tab and push the button to clear out all of your cookies or temporary Internet files. This will delete all of the temporary files that are generated by your browser.
The other way of doing this is to navigate to the following folder in Windows Explorer:

C:\Windows\Temp

Windows doesn't like you messing about in these folders, but you can just get there if you've got administrative privileges on your own machine. Once there, you can delete all of the temporary files. If some of them are currently being used, Windows won't let you delete them.

Then you can go to this folder: C:\Windows\System32\Temp

You can repeat the process, but usually, if you've run the Disk Cleanup utility, these folders will be already almost empty. Depending on how often you do this per year, you can salvage quite a bit of disk space, as you've seen in my example.


Saturday, April 26, 2014

How to Install Windows Programs in Ubuntu

To Install Windows Programs in Ubuntu you need application called Wine. If you don't have installed this application on your system, here are also explanation how to do it.Wine will let you to run Windows software on Ubuntu. It's worth to mention that not every program works yet, but however there are a lot of people that are using this application to run their software. With Wine, you'll will be able to install and run Windows applications just like you would in Windows OS.

Steps


  1. Install Windows Programs in Ubuntu Step 1.jpg Go to Applications > Ubuntu Software Center which is located in Main menu.
      

  2. Install Windows Programs in Ubuntu Step 2.jpg
    When you open Ubuntu Software Center you will need to type 'wine' in search function which are located on the right upper corner of the window and hit Enter. 

  3. Install Windows Programs in Ubuntu Step 3.jpg
    Choose 'Wine Microsoft Windows Compatibility Layer' package.

  4. Install Windows Programs in Ubuntu Step 4.jpg
    Click on the 'Install' button, after that when it asks you for password, type the password and click on 'Authenticate' button or just hit Enter.

  5. Install Windows Programs in Ubuntu Step 5.jpg
    While you installing this application, somewhere in the middle, you will be asked to confirm EULA license terms. To do that, mark that little white box and click on 'Forward' button.

  6. Install Windows Programs in Ubuntu Step 6.jpg
    Now when Wine is installed, go to Applications > Wine, where is Wine located and and try to explore a little, to see options that this application have.

  7. Install Windows Programs in Ubuntu Step 7.jpg
    Now first what you need to do is to locate your setup.exe. where is located and then right click with your mouse on that file.

  8. Install Windows Programs in Ubuntu Step 8.jpg
    Now click on 'Permissions' option and then mark that little box beside 'Allow executing file as program' option. After that click on 'Close' button.

  9. Install Windows Programs in Ubuntu Step 9.jpg
    Now when you click with left mouse button on the setup.exe, file will start run. 

Google Analytics on your Dashboard

Either you’re a web developer, blogger or anyone with a website, you probably use Google Analytics to collect and process crucial data about your site’s visitors.

Gaget Shot
If you’re using OS X you will love this dashboard widget!
Put Google Analytics on your Dashboard – Download Gadget

Features

  • See the important information of the day without any clutter
  • Check out the number of your visits for the last two weeks
  • See the rate of new visitors and bouncers
  • Refresh data with one click or wait for the automatic refresh
  • Automaticaly check for updates
  • Easily switch between profiles
  • View one, two or four weeks’ data
  • Change the chart between visitors, new visitors rate and bouncers rate

Access Google Voice over SIP (globally)

Background

Google Voice provides users with a free US phone number. That number has to forward to another US number to be of any use. Normally this would be your US mobile number, or a US home number, or any other US number. If you live or travel outside the USA it becomes impossible or very expensive to receive your Google Voice calls. The way around this issue is to use a soft-phone. That’s a phone you run (as software) on your computer (or on your smart phone, tablet, iPad, etc.). So long as the device has Internet access, you can receive your Google Voice calls with it.
A soft-phone utilises what is called SIP VOIP (session initiated protocol, voice over Internet protocol). But Google Voice does not offer SIP access to their service. So the answer is to get another free US number that does provide SIP/VOIP access. Sipgate was a great company providing exactly that. As mentioned, on October 31st 2013 they are closing up shop. We need a Sipgate alternative.

CallCentric – the Sipgate Alternative

After much research online, I found CallCentric to be the best alternative to Sipgate. Unlike Sipgate, CallCentric only provides free incoming numbers in New York. But that’s fine, because you will never give this number out, and no one will call it.

Setting it all up

These instructions are for setting up your Mac computer to receive Google Voice calls. If you want to set up on Android, iOS, or Windows, the steps will be similar except you will use a different application or app as the SIP/VOIP soft-phone.
1. Go to www.callcentric.com and sign up for a free New York number.
2. If you don’t already have a soft-phone installed, download and install a soft-phone.
There are many options. Here is a small list of the soft-phones I have used and can recommend:
There are various commercial phones. The pro version of iSoftPhone is good, as is Bria. There is also a pro version of Blink.
3. CallCentric give you a CallCentric “extension” number. This is different from the DID (phone) number they issue you. It is the extension number you will use as your SIP username. Access the CallCentric Dashboard (on their web site, after you login) to see your CallCentric Extension #.
4. In the soft-phone add a new account. Use the CallCentric Extension # as the username. Use the password your set up with your CallCentric account. Use callcentric.com as the domain name.
CallCentric also provides instructions on how to download and set-up a soft-phone on various devices.
5. Your soft-phone should indicate it is connected. It might do this with a “status” that says “online” or “available”, etc. Now you need to instruct Google Voice to forward to your new CallCentric number
6. Log into your Google Voice account. Go to your account settings.  Add a new forwarding number, using the New York number CallCentric issued you. This is NOT the 1777… number (your Extensions #), but the actual phone number they gave you.
7. Google Voice will make a call to your CallCentric number. You will answer this call on your soft-phone. Enter in the code Google Voice provides you with.
You now have Google Voice set up to forward calls to your soft-phone.

Free ASP.Net Hosting

Somee.com is a good free asp.net web hosting provider. It gives you a free hosting in following features.

Storage capacity   : 150MB
Monthly transfer  : 5GB per Month
Domains               : 1
ASP.Net               : 4.5/4.0/3.5/2.0/1.1
AJAX                   : 3.5/1.0
MS Access           : 2003, 2007
MS SQL db size   : 15MB
MS SQL log size  : 20MB
Get Free VPS Hosting
After Launching your web site a small somee.com add will be displayed at the bottom. This add don't affect your website UI.
You should visit your website at least once in a month. If not your website will be deleted. To get your free Hosting Account please sign up https://somee.com/FreeAspNetHosting.aspx


Wednesday, April 23, 2014

Free Download Ubuntu Desktop


Ubuntu 14.04 LTS


The latest version of the Ubuntu operating system for desktop PCs and laptops, Ubuntu 14.04 LTS comes with five years of security and maintenance updates, guaranteed.
Ubuntu 14.04 LTS release notes


64-bit
http://www.ubuntu.com/download/desktop/thank-you?country=--&version=14.04&architecture=amd64


32-bit (for machines less than 2 GB ram)


64-bit Mac (AMD64)                                


Easy ways to switch to Ubuntu 14.04 LTS

From Ubuntu

If you’re already running Ubuntu, you can upgrade in a few clicks from Software Updater.


Visit UBUNTU site >> http://www.ubuntu.com/


Tuesday, April 15, 2014

How to watch Satellite TV channels on Computer?


I want to watch satellite TV programs on my pc, does anyone know any good ways to watch satellite TV on computer?
—–Tom
Often heard in forums that people have this demand, but have no idea on how to achieve it? Actually, only need satellite TV services, you may feel convenient to watch satellite TV channels on your PC. There are three optional ways, we’ll explore on this page, you can choose the most suitable way for yourself.
  • Option 1: Connect a satellite dish directly to your PC
  • Option 2: Connect your satellite box to a PC
  • Option 3: Watch satellite TV channels over the Internet


Option 1: Direct connection to Satellite dish

With a satellite dish, a satellite receiver, a cable, you can watch satellite tv shows on your pc. It effectively replaces the set-top box with higher quality and flexibility. The signal will be more stable and you can have more initiative.
We’ve founded the series digital satellite TV receiver at buydvb.net, which will fulfill the job.
You can see the picture on the right, plug one end into a PC,
the other end to your dish, and use the supplied
software to access the free-to-view satellite TV channels.
You won’t be able to get the subscription channels, as you won’t be able to plug in a Sky subscription card.
We recommend: TBS6981-DVB-S2 PCI -E TV Card.
With it, user can simultaneously receive dual DVB-S2/S TV channels, this enables the user to watch one channel from one transponder/satellite while recording another channel from a second transponder/satellite. Alternatively the user can use one channel for data download while watching TV on another channel at the same time. TBS series products are fully supported under 32bit/64bit Windows 2000 / XP / Vista / 7 and Linux. The user can use TBS products for high speed satellite internet or data download if such service is provided by service providers.


Option 2: Connect Satellite TV set-top box to your PC

The option is to connect an output from your satellite TV box into a TV receiver on a PC.
First of all, you will need a PC TV receiver. There are a number of different makers and models in the market. Here we’ll look into the types that plug into a USB socket on your computer:
These small boxes plug into your PC or laptop’s USB port, and let you watch TV via a TV aerial connector.
To be able to watch satellite TV on computer, you need a TV adapter that supports analogue. The best method is to get a TV adapter that supports both analogue and digital. .
We recommend: TBS5921 QBOX3
Once you have a PC TV receiver, you need a way of connecting the output of your satellite receiver to the input of your PC TV receiver.

Option 3: Watch Satellite TV Channels over Internet
 
Here’s a top list of 10 Places To Watch TV For Free Online.Because of IPTV is based on the Internet Protocol, it is sensitive to packet loss and delays if the IPTV connection is not fast enough.
1.Watch Tv Shows Online (completely free alternative to cable television that lets you watch TV shows online using just your browser.)
2. TV Shack (Over 2,000+ TV shows or 90,000+ episodes, including all the big shows like Lost, Prison Break, etc)
3. Streamic (More then 300 real TV channels to choose from including NBC, ABC, ESPN, BBC1 and many more, organized in categories and ranked by the site users)
4. Surf the Channel (. Streaming TV, free movies, free TV and many other categories of streaming video through the STC video search engine and listings.)
5. PPStream (Sports, movies – all in one please. Just choose a show from the list of available channels)
6. ABC (Watch popular shows like Lost, Desperate Housewives, Alias etc online)
7. Channel Chooser (Watch live TV channels online on your computer. Free and fast.)
8. PPlive (a popular service for watching many foreign channels)
9. TV-Video (All the latest TV shows as they aired including 24, Smallville, Prison Break, Lost etc)
10. Graboid Video (Graboid Video makes it easy to access to the most extensive library of full length videos with over 150000 videos online, and now you can try it free. )

Thursday, March 27, 2014

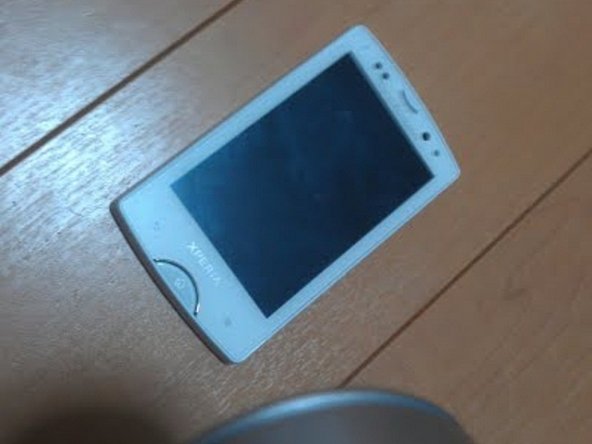
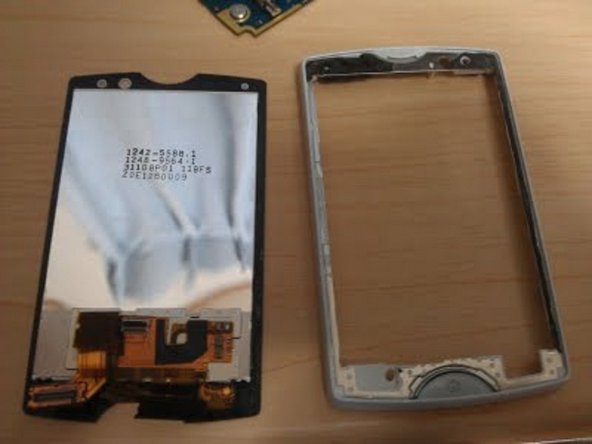
Sony Ericsson Xperia Mini Pro SK17i Teardown

Sony Ericsson Xperia Mini Pro SK17i Teardown

SK17i Guide aint found anywhere on the www, so i figured i'd make one for the kind ppl, whom has provided some great guiden for me trough the repairs i've made :) Please enjoy, and comment.
Image #1

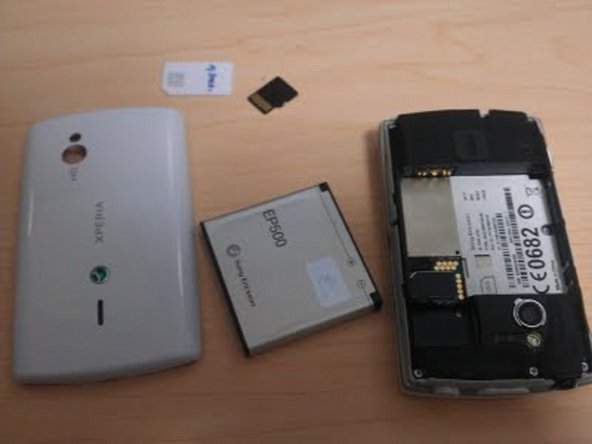
Step 1 Sony Ericsson Xperia Mini Pro SK17i Teardown

  • Turn Off the phone :), Remove back cover, battery and simcard + sd card from the phone!
Image #1

Step 2

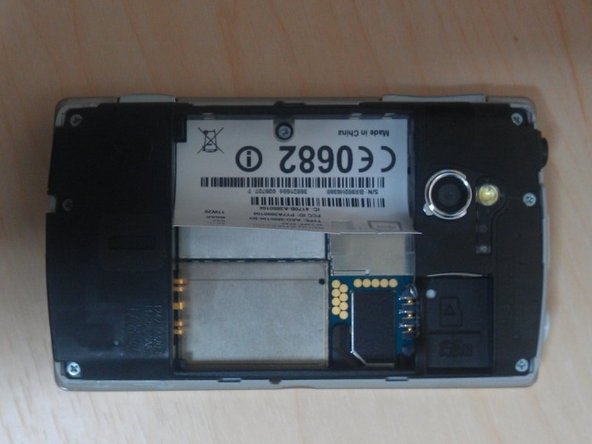
  • Behind the battery, you will have to remove the CE sticker!
  • Remove from Sim-tray and down, it wont break.
Image #1

Step 3

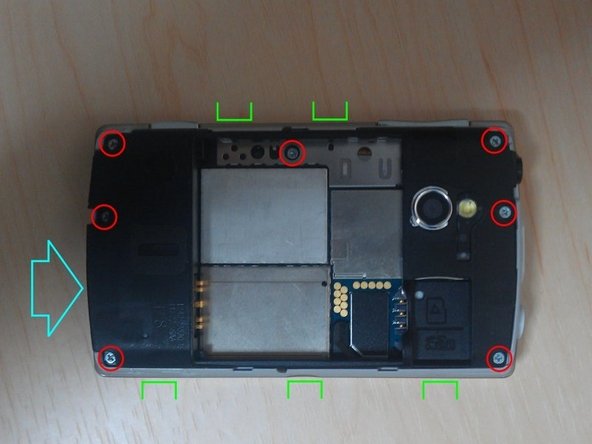
  • Remove 7 bolts.
  • Release clickholders, 5 pcs (green). The back should lift up from the surround.
  • Release from the bottom up.
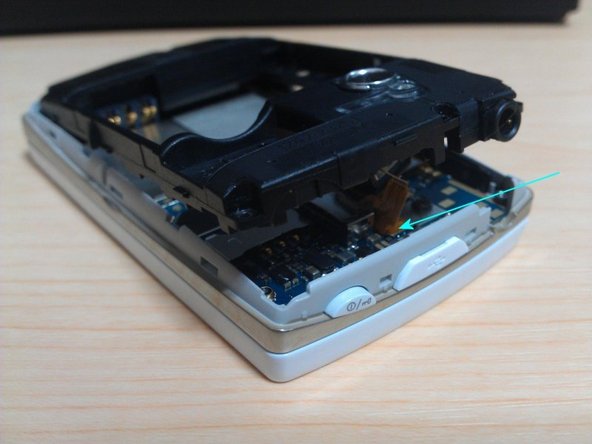
  • Be careful around the camera, as theres a Flex cable right under it, attatched to the logicboard.
Image #1

Step 4

  • Release the Flex cable by lifting the lower end off the logic board, and lift off the back assembly.
Image #1

Step 5

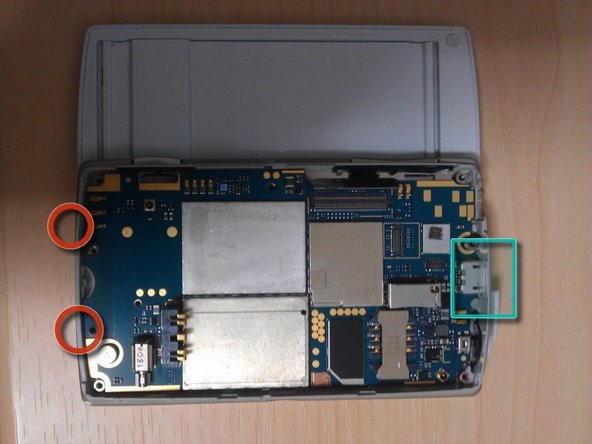
  • Remove the logic/motherboard.
  • Push the motherboard from the keypad side, it should pop out
  • Be careful with:
    • the small clips...
    • ...and the rubber USB port plug :)
  • Start loosening the board from the end with the 2 red circles.
Image #1

Step 6

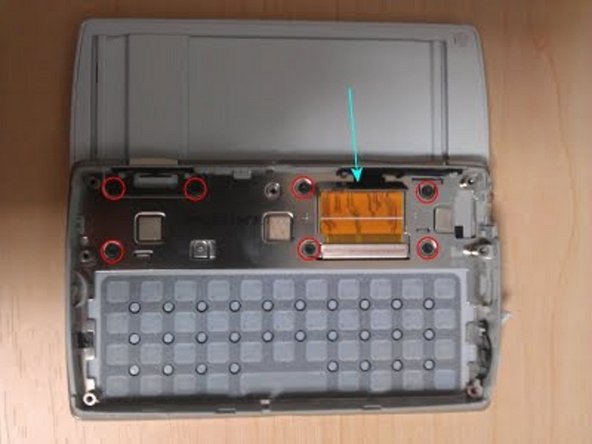
  • Release Screen flexcable + lift off of adhesive under flexcable!
  • Remove 7 bolts (black ones), holding the slide/screen in place.
Image #1

Step 7

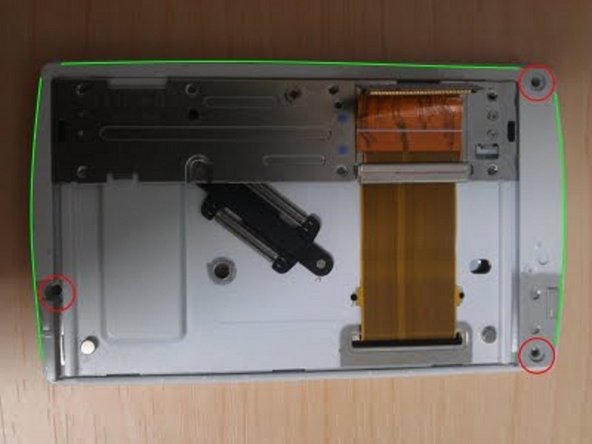
  • Remove 3 bolts, top right one is covered, look carefully
  • The Green line, shows where to flick the slide off of the screen assembly!
  • Easiest way: is to flick it at the top, where you removed 2 bolts. It will come off, pretty easy.
Image #1

Step 8

  • Once slide is removed, you got access to LCD and touch assembly. Easily remove the small flexcable from touch to LCD and take off LCD.
  • Only the Touch screen is left -> next.
Image #1

Step 9

  • The LCD and the Touch glass CAN NOT be separated!!!!!!!!
  • Go to step 10!
Image #1

  Step 10

  • Use a thin tool to wiggle the touch screen from the metal+plastic frame, and then throw the lcd + touch screen into the BIN (ONLY IF U NEED TO REPLACE LCD OR TOUCH SCREEN)
  • I hope this 10 step guide helps some of you guys out there!
  • AGAIN:
  • THE LCD + TOUCH GLASS CANNOT BE SEPARATED! BUY NEW ASSEMBLY!
Image #1

Step 11

  • Please scan, and "like".
  • And comment on my guide if you want :)
  • Thanks for watching!
  • <-- #BadNews... This is what happens if you try removing the touch glass from the LCD


Wednesday, March 19, 2014

Web sites with URL redirection service


  • V3.com URL Forwarding: url or domain forwarding (also called 'redirect') transfers your traffic from your V3 Sub Domain to another domain. Build traffic for a V3 domain and then redirect it to any site you want without changing your hosting provider! Matching Email Forwarding: together with your V3 sub domain you get a free email address that will forward wherever you want, i.e. if you get 'mysite.go.to' your email forwarding will be mysite@go.to. 
  • DomainProcessor.com - Domain Name Registration Service, Register your domain name through DomainProcessor and use our Free Ad-free URL Forwarding Service! Absolutely NO advertisements on your site! Users type in your domain name and they are sent directly to your existing site. It's straight forward Free Ad-free URL Forwarding. 
  • 4-all - Get url like yourname.4-all.org.
  • Domain.TK Free domain forwarding, Register a domain name. It's FREE! For example: www.mydomain-name.tk Dot TK - Renaming The Internet
     
  • Shorturl.com is a cost free and annoying ad free URL forwarding service (a.k.a URL redirection) To get a ShortURL for your website. start by choosing a username.domain.com. 
     
  • Beam.to - http://beam.to/you
  • Active.ws - Redirection service with traffic statistics, useful web site tools and no ads. 
  • F2B.be - Get one (or more) subdomains of our domains: you.f2b.be you.ssr.be you.short.be It's all AD-free. 
  • Here is - here.is/you and also email address. Only for non comercial use. And only two redirects per user. At the bottom of their redirects (your web pages) there will be space for advertisements (banners). 
  • Webalias - webalias.com/you. This URL redirection allow you to add access restricitions on your site. You get statistics too, and will be listed in their directory. 
  • Has.it - Choose from: has.it, does.it, knows.it, shows.it, makes.it, owns.it, rules.it, says.it and rock.it. And no advertising.
     
  • HotRedirect - You can choose from 8 domains: hothere.com, coolhere.com, homepagehere.com, mustbehere.com, onlyhere.com, pagehere.com, surfhere.com and zonehere.com. Plus: URL hiding, path forwarding, unlimited email adresses, detailed hit tracker and free submission to major search engines.
  • ipFox - "You get yourname.ipfox.com subdomain. Fetaures: no advertisements - you will not be annoyed by popup banners or delayed redirection, optional ""www"" - you can access your site with or without ""www."" prefix, path forwarding and URL cloaking." 
  • zwap.to This is a totally free URL redirection service that allows you to obtain a shorter, easier to remember URL such as zwap.to, zwitch.to, zlap.to, zmack.to, zlip.to or znap.to. Make it easier for those web surfers to remember your sites address and keep them coming back thanks to zwap.to. 
  • Explode.to Explode.to offers FREE URL redirection. Instead of some long and hard to remember address you can have something as easy as http://explode.to/yoursite. This service is 100% free of charge with no annoying popups or ad banners. 
  • Shim.net - Currently available: you.shim.net and you.freegaming.org.
  • Ulimit - You can have address: you.fr.st, you.ca.tc, you.be.tf, you.com.bi, you.bsd-fan.com, you.java-fan.com, you.linux-fan.com, you.unixlover.com, you.best.cd or you.fr.fm. 
  • MYredirector 16 domains for your shorter URL, ClickToGet.to ClickToSurf.to ClickToLearnHow.to ToGet.to ToFly.to ToZip.to GotIt.at lapageweb.de and more 
  • CJB.net yourname.cjb.net 
     
  • IsCool Many URLs 
     
  • Gonow.to This Short address can also be accessed as http://gonowto.com/yourname and http://gonowto.net/yourname. Get it now. 
  • Opt.To - Free URL Redirects - Many urls and sub domains to choose from! - Cool Domain Names and Sub Domains We can offer you a Free Redirect URL that will be easy to remember and does look cool ! You keep your current service provider and current URL, which will be the target url. 
  • VDirect - Free Lifetime URL and Email Address with a VDirect Redirect If the URL your Internet Service Provider gives you is long, or hard to remember, a VDirect allows you to