Thursday, March 13, 2014

Hacking Using The IP Address

[IP ADDRESS]

If you want to gain acsess to a computer first you will need there ip address, i recommend you use command or cmd. If you dont no what this is stop now. To open up cmd go to start>Run>(then type cmd)and press enter.

I recommend that you use msn messenger while trying to get someones ip address, first what you do is:
>open msn messenger and sign in.
>open cmd (see above) and type in ''netstat''
>You will see a few ip addresses in the foreign address list.
>write these down or make a note of them.
>Now start sending a file to your victim using msn messenger
>After they accept the file open cmd and type in netstat again
>The ip address that is in the foregin list that wasent there before is the ip of you victim.

[TROJANS]


Now that you have your victims ip address you now need a trojan software such as sub7 this software is also known as RATS (im not listing RATS you can find them out for yourself but i will post i link at bottom of website that might help you) Once you have the software (RAT) you will need to send the victim your server, (WARNING! if you victim has a firewall or anti - virus software then you've had it cause the firwall will block you out and the anti - virus software will delete your server. but if you lucky and your victim is a idiot and has no security on there pc then just send them it and use the ip address you found to connect to them. 
[CMD COMMANDS]

  • Netstat  = displays ip address connected to your computer (victims)
  • Netstat -an

  • Ping [IP] = shows if the ip specified is real
  • Nbtstat -a [IP] = if this shows a list of stuff and a 20 in one of the rows then you can do stuff.

Hack a Computer Only with just a IP Address in Easy steps

Steps to Hack IP Address:


1) Prepare the IP address of the Victim. (e.g : 101.23.53.70 )


2) Download and Install Advanced Port Scanner.


3) Open Advanced Port Scanner and Type the IP Address in the right column and Click Scan.


hack pc, hack with ip
 
4) It will lists you all Opened Ports of the Victim’s PC or Router. (e.g : Port 91 )
 
5) After retrieving the IP address and the Opened Ports of the Victim, Open Command Prompt (CMD)
 
and Type: telnet [IP ADDRESS] [PORT]
 
e.g : telnet 101.23.53.70  91
 
6) Now you’ll be asked to Enter Login Information, Just type Username and Password and hit Enter.
If no password is used just type the Username.

Done! Now you’ll get access to all Victim’s Files and Documents by browsing with CMD (use cd, copy, delete, mv… to do all tricks.)


Enjoy :) 

Make Undeletable, Unrenamable Folders

Have you ever wondered how you can make a folder which neither can be deleted nor be renamed. Well, if you have, then you have come to the right place. With this trick, you will be able to create folders in Windows which cannot be renamed or deleted.

Basic Concept
The basic concept behind this trick is the use of Keywords. Keywords are reserved words in any programming language that cannot be used as names of variables. Windows also uses certain keywords in its programming. Some of them are con, aux, lpt1, lpt2, lpt3, lpt4, lpt5, lpt6, lpt7, lpt8 and lpt9.

Make Undeletable and unrenamable folders

A Test
To test this concept, make a new folder in Windows and try to give it a name same as any keyword suggested above.

Result
Windows will not rename your folder to any of the keyword given above.

Trick
So the question arises, how can we make a folder with a keyword as its name? The solution to this problem is included in Windows itself. As we know that Windows has evolved from D.O.S.(Disk Operating System), its commands can be used in Windows. You can use D.O.S. Programming in Windows to create a folder with a keyword as its name using the steps given below:-

  1. Click on Start.
  2. Click on Run. Type in "cmd" without quotes.
  3. In the Command Prompt Window that opens, type the name of the drive you wish to create your folder in the format <drive-name>: and press Enter. e.g. If you wish to create the undeletable folder in D drive, type "D:" without the quotes. Note that the folder cannot be created in the root of C:/ drive (if C: is your system drive).
  4. Type this command- "md con\" or "md lpt1\" without the quotes and press Enter. You can choose any of the keywords given above as the name of your folder.

Now Windows will create an undeletable, unrenamable folder in the drive you entered in Step 3. However the folder can be renamed to another keyword using Windows Explorer.

Deleting the Folder

Although it is not possible to manually delete the folder, you can delete the folder by typing "rd con\" or "rd lpt1\" in Step 4 instead of "md con\" or "md lpt1\".

Windows Compatibility: This works on Windows XP, Windows Vista, Windows 7 and Windows 8.

Try it yourself to create one such folder which can neither be deleted nor be renamed.

How to enable USB debugging on Sony Ericsson Xperia X10 Mini (E10i)

How to connect Sony Ericsson Xperia E10i to your Laptop for sending SMS using DRPU Bulk SMS Software for Android
Follow these steps

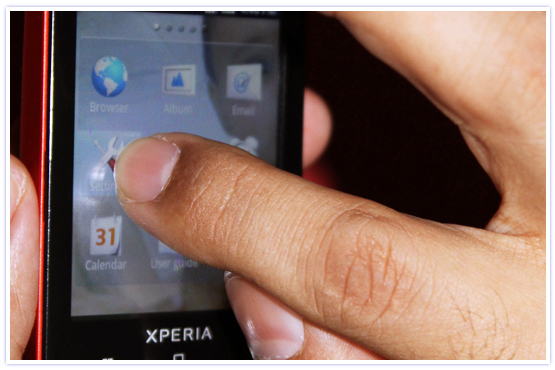
Step 1: Go to your Sony Ericsson Xperia E10i settings screen:
How to enable USB debugging on Sony Ericsson Xperia X10 Mini E10i photo 1

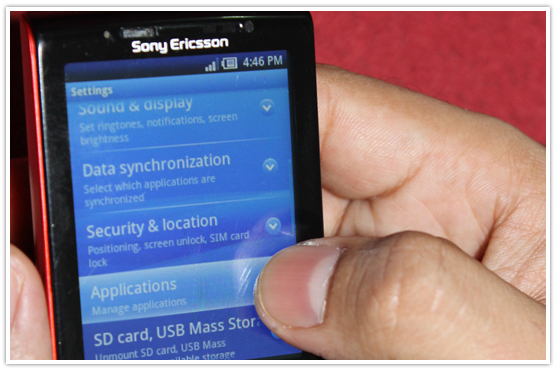
Step 2: Tap on “Applications” icon
How to enable USB debugging on Sony Ericsson Xperia X10 Mini E10i photo 2

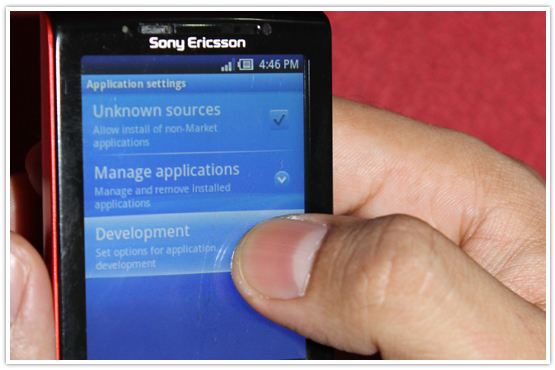
Step 3: Scroll down and Tap on “Development” Option
How to enable USB debugging on Sony Ericsson Xperia X10 Mini E10i photo 3

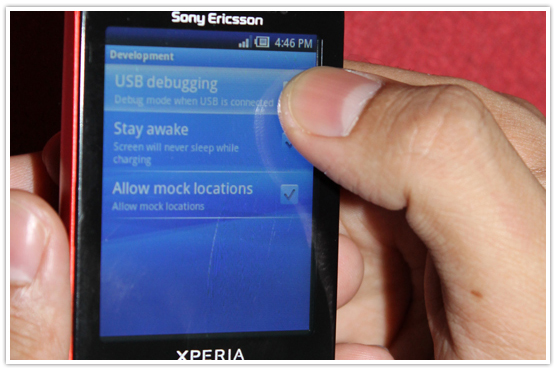
Step 4: Now, Enable to the USB Debugging Mode
How to enable USB debugging on Sony Ericsson Xperia X10 Mini E10i photo 4

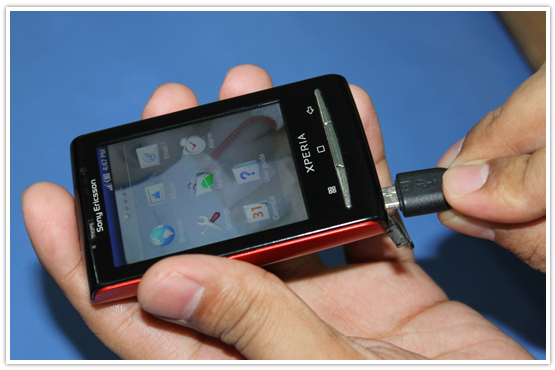
Step 5: Connect your mobile device to Laptop using USB cable
How to enable USB debugging on Sony Ericsson Xperia X10 Mini E10i photo 5

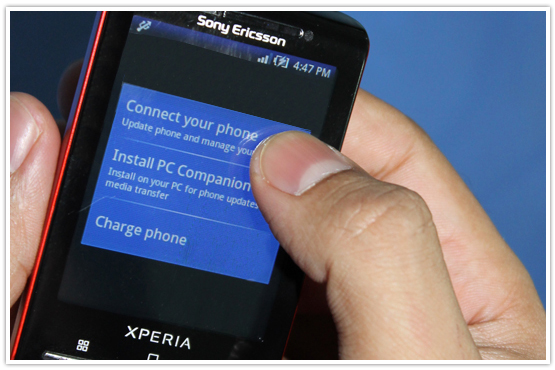
Step 6: After connecting your mobile to PC, choose "Connect your phone" option
How to enable USB debugging on Sony Ericsson Xperia X10 Mini E10i photo 6

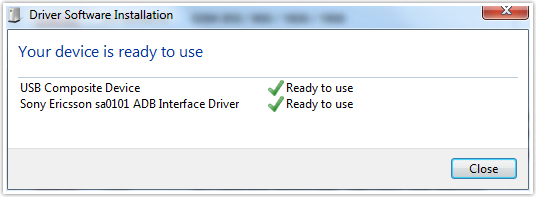
Step 7: Sony Ericsson Xperia E10i Device Drivers will installed at your laptop
How to enable USB debugging on Sony Ericsson Xperia X10 Mini E10i photo 7

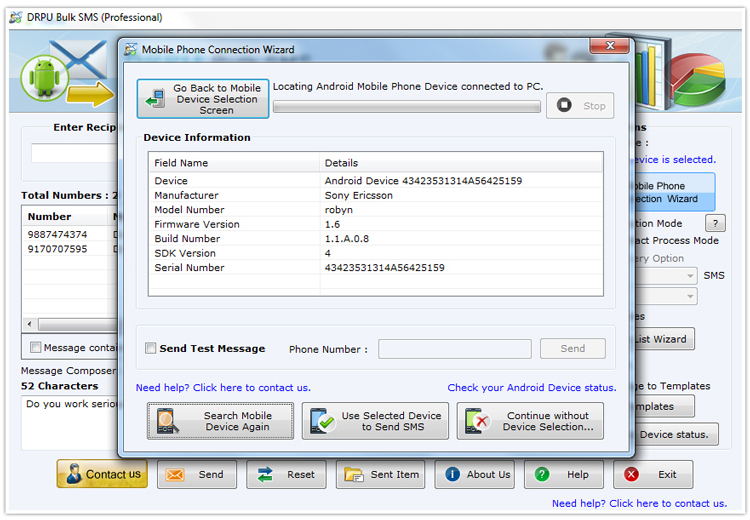
Step 8: Run “DRPU Android Bulk SMS Software” and Show your mobile device information details on your PC screen. You can easily send bulk SMS from your laptop using DRPU Android Bulk SMS Software.
How to enable USB debugging on Sony Ericsson Xperia X10 Mini E10i photo 8 


How to root Zigo Eon 6i mobile (Android 4.1.2)

  1. ADB connection PdaNet application download  
  2. Download SRSRoot
  3. Switch  on  USB debugging on  your phone

Go to Menu ----> Settings---> Developer options--->Tick ‘USB debugging ’


Also tick‘Unknown  sources’ under Menu ----> Settings---> Security


4.  Install "PdaNet" to computer " I use windows 8" . do not select phone type use "Other"


5.   Connect you'r phone to computer using USB cable.u can see computer task bar popup massage shows phone is connected


6.   Install SRSRoot " I use windows 8"


7.   Now click "Root Device (All method)"  after that Look at  SRSRoot it's show's action and Instructions
8.   Now look you'r phone . it's show's options to select . select "Install superuser" after that restart phone.
9.   All done Check phone is rooted .

Monday, February 17, 2014

Yawcam - Yet another amaizing webcam software ( webcam , Ip webcam )


What is Yawcam?
Yawcam is a shortening for Yet Another WebCAM software, and that's exactly what it is ;-)
More precise Yawcam is a webcam software for windows written in java. The main ideas for Yawcam are to keep it simple and easy to use but to include all the usual features.

Yawcam is completely free to use! ....


Yawcam features:

.: Video streaming
.: Image snapshots
.: Built-in webserver
.: Motion detection
.: Ftp-upload
.: Text and image overlays
.: Password protection
.: Online announcements for communities
.: Scheduler for online time
.: Time lapse movies
.: Run as a Windows service
.: Multi languages

Latest Release: Yawcam 0.4.1
Available for Windows 2000/XP/Vista/7
Installation package:
Yawcam 0.4.1 : yawcam_install.exe (4.45 MB)
MD5 checksum: f5f09bd6be9e1115a01325c54a4ce3ed

Requirements:
Java Runtime Environment (JRE) 6 or later.
DirectX 9 or later.
Windows Media Player 9 or later.
Windows 2000/XP/Vista/7
The installation file will tell you if you are missing something!


 Visit Yawcam Site - http://www.yawcam.com/index.php


Sunday, February 16, 2014

IP Webcam


Cover art


Turns your phone into a network camera with multiple viewing options. View your camera on any platform with VLC player or web browser. Stream video inside WiFi network without internet access.
Use IP Webcam with tinyCam Monitor on another android device or with third-party MJPG software, including video surveillance software, security monitors and most audio players.
Videochat support (e.g. Skype, Chatroulette, only video stream for Windows only via an universal MJPG video streaming driver)
Email me if you have questions after reading the FAQ.
SEO: ip webcam, wireless camera, spy cam, video streaming, broadcasting, ip camera, wifi camera, audio streaming, nanny cam, security camera, ipcam, pet monitor.

Download From Google Play  - >> CLICK HERE <<

Sunday, February 2, 2014

How to Get a Google Voice Phone Number

Log into Google , Choose a Google Voice NumberForwarding Google Voice CallsGoogle Voice Number Settings


Google Voice is a free service that allows people to choose a local number for voice mail and calling purposes. You can link your Google Voice number with your cell phone number and/or land line, so that you receive a call on all your phones and easily forward calls to transcribed voice mail when you are unavailable. Follow these directions to get a Google Voice phone number and start to use your account.

Part 1 of 4: Log into Google

  1. Go to www.Google.com/voice. Sign into your Google account. All of Google's products are now unified, so you will use the same username and password you use for Gmail.
    • If you do not use any Google products currently, then you will want to create a Google account. Go to accounts.google.com/NewAccount to enter your information and sign up.
  2. Wait for the prompt on the Google.com/voice site that says "Set up your Google Voice Number."
    • If the prompt does not appear, click on the link that says "Get a Google Voice Number" on the left hand side of the page.

Part 2 of 4: Choose a Google Voice Number

  1. Click on the "I want a new number" button in the first set up prompt.
    • You have the option to set up the Google Voice account with your mobile phone number. That will keep you from being able to use some of Google Voice's features. You can always use your Google Voice number in conjunction with your mobile phone number.
  2. Enter your zip code or area code to find an available local number. Click "Next."
    • If no phone numbers are available, enter a nearby zip code. Some large metropolitan areas do not have local phone numbers available.
    • If you are starting a Google Voice account in order to make free phone calls within the US or Canada, you can choose a phone in the zip code where your most-called family members or friends live. People who use land lines can call your Google Voice number free of charge, and it will ring on your cell phone number.
  3. Choose your number from a list of numbers when you find a zip code with available phone numbers. Click on the circle next to the number and choose "Continue."
    • Remember that you must pay to switch your number in the future, so choose well.
  4. Enter a Personal Identification Number (PIN) to access your phone number. Write down the number or make sure you can remember it.

Part 3 of 4: Forwarding Google Voice Calls

  1. Look for a prompt that asks you to link a forwarding number to your account. You can set up multiple numbers in the future, but this will allow you to connect your accounts now.
  2. Enter the number of your choice. Select what type of phone it is.
  3. Find the confirmation number on the next prompt screen. Click the "Call Me Now" button to verify it. Make sure your other phone is nearby so that you can answer it.
    • The confirmation allows Google Voice to ensure that you are using a forwarding phone that belongs to you.
  4. Answer the phone. Type in the confirmation number when prompted.
  5. Continue following the prompts to set up your personal voice mail message. One of the main advantages of Google Voice is that it offers digital voice mail with transcription so that you can get voice mail messages on your Gmail account.

Part 4 of 4: Google Voice Number Settings

  1. Return to Google.com/Voice to see your account history. 
  2. Change the settings by clicking on the gear icon on the top right part of the page.
  3. Remove call screening. Save your changes.
    • Call screening makes the person who is calling enter their name. It also tells them that they are using Google Voice. Most Google Voice users prefer a transparent system that users do not know is pulled together using Google Voice.
  4. Add your credit card information under the "Billing" tab. This is only necessary if you want to make cheap international calls. You can check the rates for calls to foreign countries before you call. 
  5. Download the Google Voice application onto your smart phone if you are using an Android, Blackberry or iPhone. Using the app will allow you to call from your Google Voice number, send and receive text messages on your phone and view history easily on your phone.
  6. Load your contacts using Google Contacts. You can also import contacts from your phone or other sources.
  7. Pay $10 to change your Google Voice number. If you move, paying the fee will transfer your history and your contacts. It will also keep your old number for 3 months while you transfer new information to your contacts.


Saturday, February 1, 2014

Dropbox - Your stuff, anywhere

"One place for all your stuff, wherever you are."

Dropbox is a home for all your photos, docs, videos, and files. Anything you add to Dropbox will automatically show up on all your computers, phones and even the Dropbox website — so you can access your stuff from anywhere.
Dropbox also makes it super easy to share with others, whether you're a student or professional, parent or grandparent. Even if you accidentally spill a latte on your laptop, have no fear! Relax knowing that your stuff is safe in Dropbox and will never be lost.


Wherever you are
Put your stuff in Dropbox and get to it from your computers, phones, or tablets. Edit docs, automatically add photos, and show off videos from anywhere.
Share with confidence
Share photos with friends. Work with your team like you're using a single computer. Everything's automatically private, so you control who sees what.
Safe and secure
Even if your phone goes for a swim, your stuff is always safe in Dropbox and can be restored in a snap. Dropbox secures your files with 256-bit AES encryption and two-step verification.
Dropbox for Business
Millions of people use Dropbox at work. With Dropbox for Business, get the power and security of Dropbox plus robust admin controls, dedicated support, and all the space you need. Learn about Dropbox for Business.


https://www.dropbox.com/register

https://www.dropbox.com/register